Creating a (Cloudflare hosted) blog with Hugo
Table of Contents
In this guide I will go through the steps required to create a personal blog with Hugo using the Hugo Blog Awesome theme, a minimal and modern theme with dark mode support (a demo is available here). Also, we will host the blog (for free!) on Cloudflare Pages with GitHub integration.
The theme requires Hugo extended version v0.160.0 or later. The Hugo version available in package repositories varies based on Linux distribution and release, and in some cases will not be the latest version. You can install the latest version here.
To install the extended edition of Hugo on Linux:
sudo snap install hugo
See the docs for more details.
Run the following command to display version and environment info:
hugo version
After installing Hugo and Git, we are ready to go.
Creating a local Hugo project and adding it to GitHub
A GitHub account is needed at this point as we need to set our Git user settings:
git config --global user.name "My name"
git config --global user.email "YOUR_EMAIL"
Next, create a new Hugo site:
hugo new site myblog
After running the command, a Hugo project might look like:
myblog/
├── archetypes/
├── assets/
├── content/
├── data/
├──  i18n/
├── layouts/
├── static/
├── themes/
└── hugo.toml
Now, initialize a Git repository for the newly created Hugo site:
cd myblog
git init
git add .
git commit -m "Initial commit"
git branch -M main # rename the initial branch to 'main' (default is 'master')
Go to GitHub and create a new repo (it can be private) for your Hugo project. Copy its HTTPS URL and link it to the local folder:
git remote add origin https://github.com/Myname/myblog.git
Add the following folders to a .gitignore file so that the public output files that Hugo generates don’t end up in the repository:
# .gitignore
/public
/resources/_gen
.hugo_build.lock
Then you can push the code to the new repository:
git push -u origin main
Note: Many of the subfolders won’t actually be added to the repo yet because they’re empty at this point.
Setting up the theme
After creating the new Hugo site, we need to use the Hugo Blog Awesome (HBA) theme as a Git submodule.
If you want to properly customize the Hugo Blog Awesome (HBA) theme, then it is a good idea to fork it. If you add it as a Git submodule, you can still get updates for it from the original repo. So fork it first here and add your own forked theme repo as a Git submodule:
git submodule add https://github.com/Myname/hugo-blog-awesome.git themes/hugo-blog-awesome
After this command, the /themes folder will contain the hugo-blog-awesome theme.
Note: Submodules allow you to keep a Git repository as a subdirectory of another Git repository. This lets you clone another repository into your project and keep your commits separate. In other words, Git Submodules allow you to have a parent Git repository that contains other Git repositories within as subdirectories.
Next, you should copy the provided example configuration file /themes/hugo-blog-awesome/exampleSite/hugo.toml to the root folder of your new Hugo site.
From the /myblog directory:
cp -r themes/hugo-blog-awesome/exampleSite/hugo.toml .
and push the new submodule to the repo:
git add .
git commit -m "Added the Hugo Blog Awesome theme as a submodule"
git push -u origin main
You can edit the general settings of your Hugo site from this hugo.toml configuration file. In particular, set the theme from the hugo.toml using the theme variable.
theme = "hugo-blog-awesome"
Since I don’t want the blog in other languages, I removed all the settings for the other languages, keeping only the English language configuration. Be sure that the contentDir parameter is set to content/en:
# Under [Languages.en-gb]
contentDir = "content/en"
When you have changed the settings to your liking you can commit and push the changes of the file to your repo.
git status
git add .
git commit -m "Modified hugo.toml file"
git push -u origin main
By default, the /myblog/content/ directory is empty. So, we copy over the content from the exampleSite directory (which contains pages of an example website). To do that, from the /myblog directory, run:
cp -r themes/hugo-blog-awesome/exampleSite/content/* content/
From the /myblog/content folder we can now remove all the folders related to the other languages and keep only the language subfolder /en.
We do the same also for the assets directory:
cp -r themes/hugo-blog-awesome/exampleSite/assets/* assets/
Remember to add, commit and push again.
To preview your site (you must be within the /myblog folder):
hugo server
Note: Hugo will exclude any content files marked as drafts (draft: true) when building and serving the site, so those pages won’t appear on the local site. To include draft pages, so you can preview unpublished content while writing, use the -D option (equivalent to --buildDrafts).
Visit http://localhost:1313 to see your site with the theme applied (the port number could be different for you).
You’re all set! You can now start creating content. The theme will be automatically included from the module.
Creating a new post
A new post can be created manually or with the following command (run it from the root directory of your blog project, where hugo.toml is located):
hugo new content content/en/posts/hello-world.md
Then, edit the hello-world.md file
In general, new content can be created with the command:
hugo new content <SECTIONNAME>/<FILENAME>.<FORMAT>
The content of the post is Markdown and its metadata is customized with Hugo’s front matter. Here’s an example of settings that can be used:
---
title: Hello world!
date: 2026-08-28
draft: true
toc: false
tags:
  - general
---
This is a test post. Hello world!
The Markdown files get processed with the command hugo. Add them to your repo like this:
git add content
git commit -m "Added new post"
git push origin main
You can preview the site locally with Hugo’s built-in server. It’s also good for previewing draft posts.
hugo server --buildDrafts
Some useful changes to make at the beginning
We can start by modifying the hugo.toml file inside /myblog
- Change
titleandbaseURL:
title = "Awesome Hugo blog"
baseURL = 'https://hba.sid.one/'
Note: after we will host the blog on Cloudflare Pages, we will change baseURL with the domain given by Cloudflare.
Under
[Languages.en-gb.menu], we can add new sections in the menu, in addition to the already existing “Home”, “Posts” and “About” sections.Under
[Languages.en-gb.params]there are several params we can change. For example, we can disable the ToC (Table of Contents) by default:
toc = true # set to false to disable table of contents 'globally'
If we modify it here, this will be enforced “globally”. However, we can also set it “locally” for each content page, by setting toc: false in the front matter of the corresponding page.
Under
[Languages.en-gb.params.author]we can modify the info of the blog’s author.At the end of the
hugo.tomlfile we can add/remove social icons (e.g., GitHub, Twitter/X, LinkedIn, RSS, …)
Note: If some modifications are not being applied to the website you are seeing, it might be useful to clean the generated site (the /public folder) and start the server again:
rm -rf public
hugo server -D
In Hugo, the /public folder is the output directory where Hugo writes the generated static website, ready to deploy. When you run hugo, Hugo takes your content, templates, layouts, assets, and configuration, then builds the final site into the public/ directory. So, /public is generated automatically and it is safe to delete as Hugo can recreate it.
Customizing the theme
If you want to customize the contents of the theme or certain pages then you need edit or create partial templates located at /themes/hugo-blog-awesome/layouts/partials. In my case, I customized the files header.html and bio.html that creates the header and bio elements on the front page.
The primary SASS (Syntactically Awesome Stylesheet, an extension to CSS) file for customizing the theme is /themes/hugo-blog-awesome/assets/sass/_custom.scss but you can also customize the other SASS files in the folder. For example, I customized the files _layout.scss and _custom.scss.
Updating the theme on GitHub (and on Cloudflare)
You need to first commit the changes to the theme repo and then to the Hugo repo.
# For the theme repo
cd themes/hugo-blog-awesome
git add .
git commit -m "Changed theme style settings for blog layout"
git push origin main

# For the Hugo repo (and Cloudflare build process)
cd ../..
git add themes/hugo-blog-awesome
git commit -m "Updated the theme"
git push origin main
Note: Cloudflare only monitors for changes in your Hugo repository and not the theme repo (that is configured as a submodule). To get your theme to update on Cloudflare you need to first commit the changes to the theme repo and then to the Hugo repo, as explained above.
Setting up Cloudflare Pages
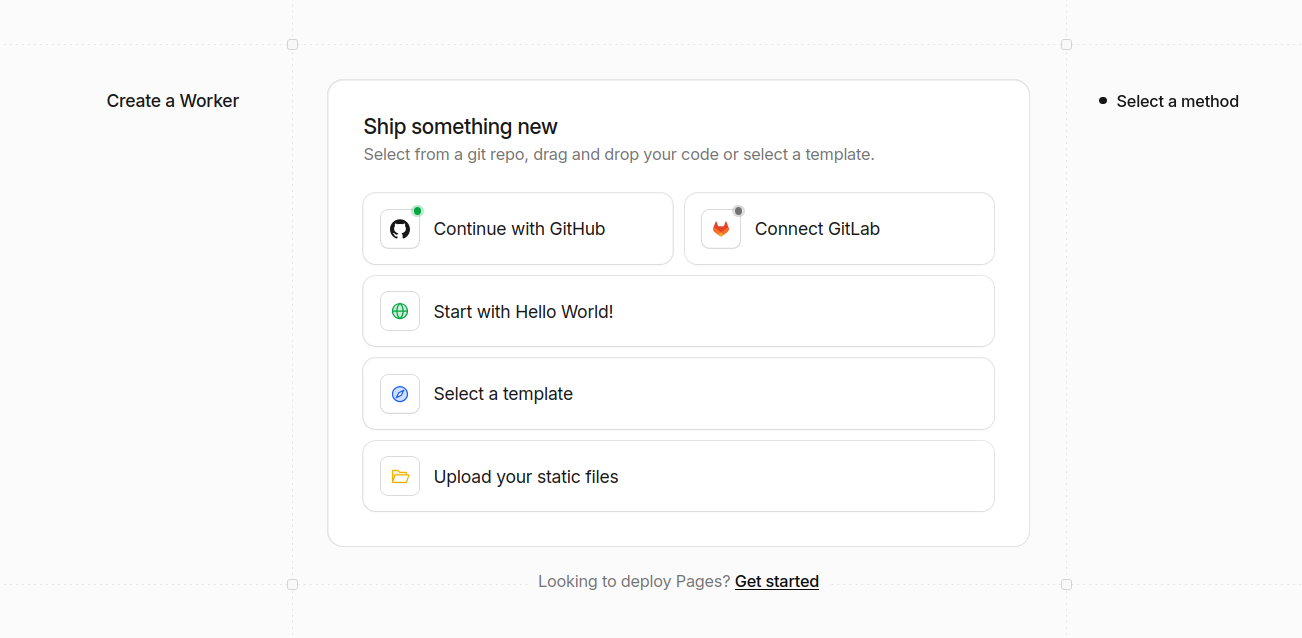
Go to Cloudflare, create an account and, from the dashboard, navigate to Compute -> Workers & Pages -> Create application, then select Pages.
Cloudflare makes it very hard to find the Pages option. After selecting “Create application”, there is a small “Looking to deploy Pages? Get started”, at the bottom, that you need to select.
After clicking on it, you need to select the option “Import an existing Git repository”:
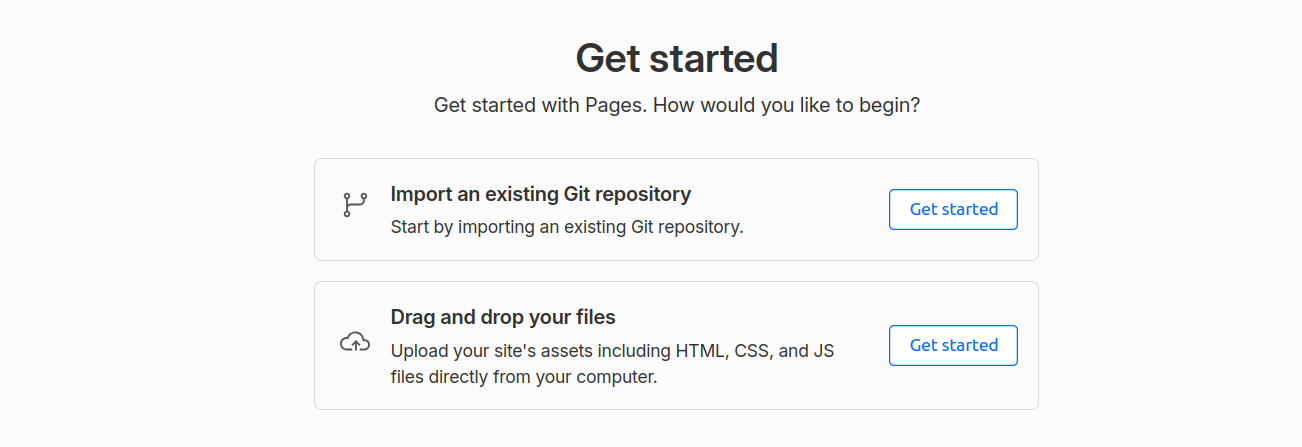
From there, add your GitHub account and select the repository of your Hugo blog. Then set the following configuration options:
- Project name: The name you want for the project
- Production branch:
main
Note: the Project name field directly determines your free .pages.dev subdomain (Pages subdomains are globally unique; if another Cloudflare user has already claimed the one you chose, you will need to choose a slight variation).
Under “Build settings”:
- Framework preset:
Hugo - Build command:
hugo --minify - Build output directory:
public
Note: the --minify option in the build command is used for optimal website performance. This command tells Hugo to strip out unnecessary whitespace and compress your site’s HTML, CSS, and JavaScript, resulting in faster page load times.
My first build failed because Cloudflare Pages was using an older version of Hugo than what the hugo-blog-awesome theme requires. To resolve this, I had to add an environment variable in order to configure Cloudflare Pages to use a newer version of Hugo:
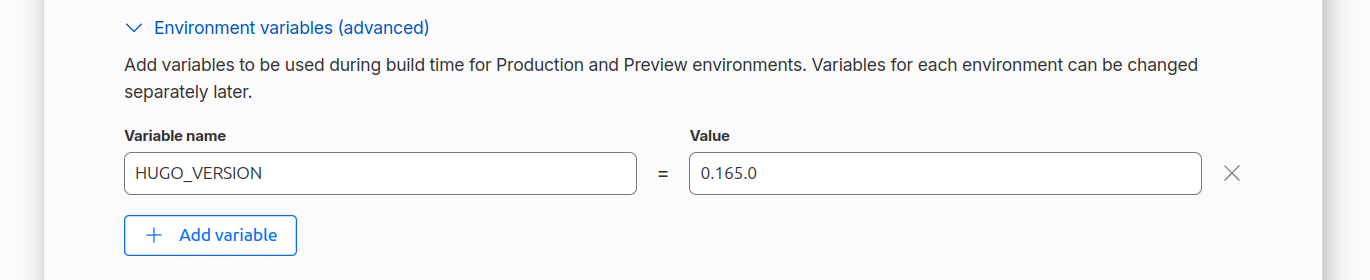
You can now click on “Save and Deploy”. After a successful deployment, you should have a functioning blog site located at *.pages.dev:

Now, what is really amazing about this setup is that CloudFlare will be the one that runs the build and updates your site. In fact, if we make some changes to the source code and push them to GitHub, we can see that another deployment will automatically kick off from the CloudFlare Workers page.
Specifically, Cloudflare monitors your Hugo repository and rebuilds it whenever it detects changes. The new post appears on the blog when you push it to your repo and its metadata contains draft: false. Remember that Cloudflare only monitors for changes in your Hugo repository and not the theme repository.
By now you should have a working Hugo blog site, with a fully customizable theme, hosted on Cloudflare Pages with GitHub integration.
If you’ve made it this far, thank you so much for taking the time to read this! :)
Riccardo